Kotahi deployment guide
Preparation
Docker
All the different parts of Kotahi are delivered as docker containers that you can run. This means that you need to have an environment that can run a recent major version of docker (version 27 as of this writing). This could be a linux server with docker installed, your own kubernetes cluster, fly.io or any of the services that cloud providers like AWS and GCP offer for running docker containers.
Note that we offer pre-built containers for the different parts of the application. There is nothing stopping you from building your own containers out of our codebase (eg. if you're extending our codebase), but this is not a scenario we will be properly supporting. We're more than happy however, to answer any questions you might have.
ORCID
Kotahi only supports logging in with ORCID at the moment. This means that you will need to set up an orcid account and create developer client / secret credentials.
To do this:
- Create an account on orcid.org and log in
- Click on your profile dropdown at the top right of the page
- Go to developer tools
- Verify your email address if you haven't already
- Click on “Register for your public API credentials”
- Fill in your application details
- Add a redirect URI. This should be your server's url +
/auth/orcid/callback. Note that your client and server will have separate urls. E.g. if your server will be running onhttps://server.myjournal.com, then the value of this field should behttps://server.myjournal.com/auth/orcid/callback. If you don't know the url of your server yet, just add a valid url. You can always come back and edit this field. - Click on generate my my ID and secret
- You should now have a client ID and client secret at the top of your page.
That's it. We'll use the client / secret pair on the server later.
S3 storage
You will need an account with an object storage provider like AWS's S3 or any other S3-compatible equivalent. GCP, DigitalOcean and many other providers offer this service. You could also self-host your own object store with min.io.
Database provider
All databases used by Kotahi are PostgreSQL. You will need to choose a provider to host your postgres databases, or set up postgres on your own servers.
Architecture overview
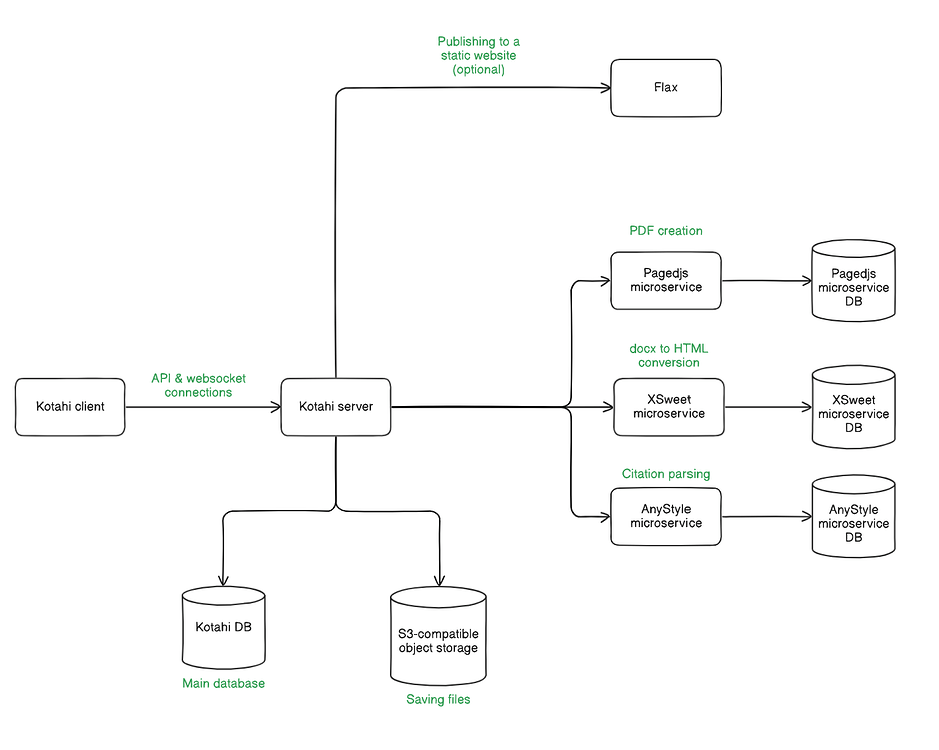
The Kotahi app is separated into a client and a server, delivered as distinct docker containers. As expected, the client contains the code that will run in the user's browser, while the server takes care of all backend operations, database connections etc. Since these two are separate containers, they will also be served under distinct urls. The client url will be what your users think of the url (e.g. https://www.myjournal.com). The server url will not be user-facing. It will be used by the client container to communicate with the server. You could use a common scheme for the server url like https://server.myjournal.com, but it is not necessary - it can be whatever url you want, as long as it reachable online.
The server will need to connect to:
- A database
- An S3-compatible object store
- Three microservices
- Pagedjs
- XSweet
- AnyStyle
Each of the microservices will need its own database.
Optionally, if you want to use the Kotahi CMS (a common scenario), you will need to use Flax, a standalone builder and server of the static website that will be the CMS's output (ie. the published articles). Think of Kotahi as the place where authors, reviewers and editors will manage what gets published and Flax as the site where the published articles are served. There are more places where the articles can be published (eg. Crossref). These can be configured inside Kotahi, and are thus outside the scope of deployment documentation.
The following pre-built containers are provided:
- Kotahi client
- Kotahi server
- Pagedjs microservice
- XSweet microservice
- AnyStyle microservice
- Flax
Databases and the object store should have been set up during the preparation phase of this doc (see further up).
Database considerations
A basic database connection is handled with the following environment variables:
POSTGRES_HOSTPOSTGRES_PORTPOSTGRES_DBPOSTGRES_USERPOSTGRES_PASSWORD
You should be able to get the values for all of these variables from your database provider, or use the values that you set up if self-hosting.
SSL certificates
It is recommended that you connect to your databases securely. Using SSL is often a requirement for many database providers. There are two supported scenarios when it comes to connecting securely.
Use SSL without certificate validation
This option will enable SSL, but will not verify the authenticity of a certificate. This can be a valid option in testing environments, or automatically created environments (eg. during CI runs). Note that since the certificate is not verified, this option is less secure than the next option.
To enable this, add POSTGRES_ALLOW_SELF_SIGNED_CERTIFICATES = true to your
environment variables.
Use SSL with certificate validation (recommended for production)
Use the POSTGRES_CA_CERT environment variable to provide the encoded CA
certificate that should be verified. Encoding is required here, as there can be
newline issues when passing a certificate as a string in certain deployment
environments.
To encode, download your certificate, then encode the file in base64:
base64 -w0 ca-certificate.crt
Use the output of this command as the value of the environment variable. There is no need to decode, this will be handled by the app internally.
When using the POSTGRES_CA_CERT variable, you do not need to use the POSTGRES_ALLOW_SELF_SIGNED_CERTIFICATES variable. In fact, the latter will be overridden by the former.
Connection pools
Using connection pools is not necessary for the app to function, it's up to you to decide whether they are a good option for your setup.
Depending on your database configuration, you might run into issues in Postgres where the connection limit is reached and further connections are dropped, resulting in failed database queries. This can be mitigated by using connection pools, but there's some steps that need to be done before everything works correctly.
Pool modes are a PgBouncer feature (used by providers like DigitalOcean and Heroku, and supported / encouraged by other providers like AWS or GCP). You might need to find the equivalent options in your own provider.
Kotahi uses Postgres for regular queries as you'd expect, but it also uses the
LISTEN/NOTIFY Postgres feature to handle live updates (ie. GraphQL subscriptions).
When choosing a connection pool mode, you have a few options, but there's two that are of interest here:
- Transaction mode: Each transaction in the code is a single connection, and the connection is released when the transaction ends.
- Session mode: The client (a Kotahi server query in our case) will open a connection which will remain alive until disconnected (eg. by the server stopping).
At first glance transaction mode sounds like what we want, but the catch is
that LISTEN/NOTIFY is not supported in this mode. In other words, all will
work well, but live updates will be broken. For live updates to work, we need a
persistent connection (ie. session mode).
To work around this, we can set up multiple connection pools on the same database and let different features of Kotahi connect to the pool they need to function correctly.
All POSTGRES_ environment variables have an equivalent
SUBSCRIPTIONS_POSTGRES_ environment variable. E.g. The equivalent of
POSTGRES_DB will be SUBSCRIPTIONS_POSTGRES_DB and so on. This will allow us
to direct all subscription traffic to a different pool (or even a completely
different database) than the rest of the app.
A possible setup could look like this:
- Set up two connection pools on the same database, one in transaction mode and one in session mode. Make sure most available connection slots are assigned to the transaction pool.
- You will now have two separate sets of database credentials. We use the two
separate sets of environment variables to handle this. Direct all
POSTGRES_variables to the transaction pool and allSUBSCRIPTION_POSTGRES_variables to the session pool.
The final result in the environment variables could look like this:
POSTGRES_HOST=myprovider.com
POSTGRES_PORT=5432
POSTGRES_DB=my-transaction-pool
POSTGRES_USER=admin
POSTGRES_PASSWORD=password
POSTGRES_CA_CERT=encoded-string

SUBSCRIPTIONS_POSTGRES_HOST=myprovider.com
SUBSCRIPTIONS_POSTGRES_PORT=5432
SUBSCRIPTIONS_POSTGRES_DB=my-session-pool
SUBSCRIPTIONS_POSTGRES_USER=admin
SUBSCRIPTIONS_POSTGRES_PASSWORD=password
SUBSCRIPTIONS_POSTGRES_CA_CERT=encoded-string
If a SUBSCRIPTION_POSTGRES_ variable is not defined, it will fall back to its
equivalent POSTGRES_ variable. This can potentially shorten the list of
defined environment variables considerably. E.g. In the example above, we could
just define SUBSCRIPTIONS_POSTGRES_DB, as the rest of the variables are the
same with their POSTGRES_ equivalents.
Microservice databases
It is worth noting that the microservices each need their own database, but the usage of that database is going to be very light (storing credentials and using a job queue). If cost is a concern, you can very likely get away with getting the cheapest database of your chosen provider for the microservices. The setup described above (regarding separate connection pools) is not worth it for the microservice databases, as they don't use live updates.
Deploying Kotahi
All the different parts of Kotahi are delivered as pre-built docker containers, so make sure you know how to run docker containers on your chosen provider.
Before we dive into specifics, it will come in handy to know how to check that all the different services you deploy are actually up and running:
- Kotahi client and Flax should be easy enough - they should display in your browser.
- All backend services (kotahi server and all microservices) have a
/healthcheckendpoint that you can go to. If you get a response, the servers are listening. All servers will try to connect to their database and (if applicable) their object store. If that fails, they will stop and you will not get a passing/healthcheck. - If you open Kotahi client and get a website, but it displays a communications
error, that means that the client cannot find the server. This is either
because the server is not up, or that the
SERVER_URLvariable given to the client is incorrect.
Setting up the microservices
We need to set up 3 microservices:
- Pagedjs
- XSweet
- AnyStyle
Each of these is a standalone server, with its own database, that kotahi server will communicate with. The deployment process for each of them is identical to the others.
When uploading a docx file to Kotahi, this is converted to HTML (via the XSweet microservice). The converted HTML then acts as a source for the in-browser word processor in Kotahi. Parsing citations in the word processor will use the AnyStyle microservice in the background. When you want to download the HTML source to PDF, this will go to the Pagedjs microservice in order to create the PDF.
Creating credentials
Each service accepts a client id and a client secret as environment variables. Kotahi server will then use the service client id and secret when making calls to the service as an authentication measure.
The easiest way to create these client id / secret pairs is to clone one of the services and yarn a specific command that will print them in the terminal for you. We'll use XSweet for this example, but we could replace XSweet with any of the other services.
If you don't already have docker and git installed locally, install them first.
To create the credentials, run the following commands:
# Get the xsweet microservice
git clone git@gitlab.coko.foundation:cokoapps/xsweet.git
cd xsweet

# Set up
docker compose build
docker compose run server yarn coko-server migrate up

# Create credentials
# Run this command as many times as you want to create a number of credential pairs
docker compose run server yarn create:client

# Clean up
docker compose down
We'll need 3 sets of credentials, one for each microservice. Make sure you note them down somewhere before moving forward. We'll need them both for setting the microservices themselves, as well as when setting up kotahi server.
Deploying a microservice
Simply run the docker container of the microservice with the following environment variables:
NODE_ENV='production'

# Replace this value with an actual strong secret
# (not the client secret from the credentials)
# Any string will do
SECRET='a-strong-secret'

# What port the server should run *inside* the container
SERVER_PORT=

# Use one of the credential pairs you created beforehand
CLIENT_ID=
CLIENT_SECRET=

# Remember that each service should use its own dedicated db
POSTGRES_HOST=
POSTGRES_PORT=
POSTGRES_DB=
POSTGRES_USER=
POSTGRES_PASSWORD=
# Optionally, refer to database section above
POSTGRES_CA_CERT=
The containers for the microservices can be found on dockerhub:
- Pagedjs:
cokoapps/pagedjs - XSweet:
cokoapps/xsweet - AnyStyle:
cokoapps/anystyle
Click on the links to find the latest versions (eg. cokoapps/xsweet:3.0.2).
Checking that the microservices are up
Say for example, you've got the XSweet microservice running, and you've deployed
it on xsweet.myorg.com. Go to your browser (or use curl, postman etc.) and
use the xsweet.myorg.com/healthcheck endpoint. If you get a json response,
the service is up.
Deploying Kotahi server
Assuming all of the steps above have been performed, you can simply run the
cokoapps/kotahi-server
container from dockerhub with the following environment variables.
NODE_ENV='production'

CLIENT_URL='https://www.mykotahi.com'
SERVER_URL='https://server.mykotahi.com'

# Port that the server will run inside the container
SERVER_PORT='3000'
# Websocket port used for collaborative editing on a document
WS_YJS_SERVER_PORT='5010'

# Replace with an actual strong secret. Any string will do.
PUBSWEET_SECRET='a-strong-secret'

# Connect to object store
S3_URL=
S3_BUCKET=
S3_REGION=
S3_ACCESS_KEY_ID=
S3_SECRET_ACCESS_KEY=

# Connect to database
POSTGRES_DB=
POSTGRES_HOST=
POSTGRES_PASSWORD=
POSTGRES_PORT=
POSTGRES_USER=
# Optionally (refer to database section above)
POSTGRES_CA_CERT=
# Override subscriptions connection if needed (refer to database section above)
#SUBSCRIPTIONS_POSTGRES_DB=

# Connect to the microservices
SERVICE_PAGEDJS_CLIENT_ID='your-pagedjs-client-id'
SERVICE_PAGEDJS_SECRET='your-pagedjs-client-secret'
SERVICE_PAGEDJS_PROTOCOL='https'
SERVICE_PAGEDJS_HOST='pagedjs.mykotahi.com'
SERVICE_PAGEDJS_PORT=''
SERVICE_XSWEET_CLIENT_ID='your-xsweet-client-id'
SERVICE_XSWEET_SECRET='your-xsweet-client-secret'
SERVICE_XSWEET_PROTOCOL='https'
SERVICE_XSWEET_HOST='xsweet.mykotahi.com'
SERVICE_XSWEET_PORT=''
SERVICE_ANYSTYLE_CLIENT_ID='your-anystyle-client-id'
SERVICE_ANYSTYLE_SECRET='your-anystyle-client-secret'
SERVICE_ANYSTYLE_PROTOCOL='https'
SERVICE_ANYSTYLE_HOST='anystyle.mykotahi.com'
SERVICE_ANYSTYLE_PORT=''

# Flax static website
FLAX_SITE_URL='https://flax.mykotahi.com'
# Flax express server
FLAX_EXPRESS_PROTOCOL='https'
FLAX_EXPRESS_HOST='flax.mykotahi.com'
FLAX_EXPRESS_PORT='3000'
# Same value as SERVER_URL
FLAX_CLIENT_API_URL='https://server.mykotahi.com'

# Configure ORCID login
ORCID_CLIENT_ID='your-orcid-client-id'
ORCID_CLIENT_SECRET='your-orcid-client-secret'
USE_SANDBOXED_ORCID='false'

# Adjust this to your needs (refer to archetype documentation)
INSTANCE_GROUPS='journal:journal'
MANUSCRIPTS_TABLE_COLUMNS='shortId,submission.description,submission.articleId,created,updated,status,author'
This is not an exhaustive list of environment variables, but should be enough to get you up and running. You can always adjust these later.
Same as for the microservices, you can use the /healthcheck endpoint to
verify that your server is up.
Deploying Kotahi client
Keep Kotahi client and Kotahi server on the same version, as they are published in lockstep.
Run the cokoapps/kotahi-client
image from dockerhub and run it with the following environment variables.
# Which port the client should run inside the container
CLIENT_PORT='4000'

# The url where the client can find the server
SERVER_URL='https://server.mykotahi.com'

# The host should be your server url, but with a wss protocol
# The port should be the value of WS_YJS_SERVER_PORT from the server's variables
YJS_WEBSOCKET_SERVER_URL='wss://server.mykotahi.com:5010'
Deploying Flax
Flax consists of two parts internally: a node server and static website server. The node server will request published article data from kotahi server and build a static website out of them. That website will in turn be served by the static website server.
To deploy flax, simply run the cokoapps/kotahi-flax container with the following environment variables.
# The port that you want the node server to run on
FLAX_EXPRESS_PORT='3000'
# The url of your kotahi server
FLAX_CLIENT_API_URL='https://server.mykotahi.com'
The static website will run on port 80 inside the container. You can map that to whatever port you want in your environment.
Scalability
The separate-pieces approach of the architecture is meant to allow the different servers to scale independently from each other. You could for example, scale kotahi server to run on 5 machines, but only scale the xsweet microservice to run on 2 machines.
Furthermore, since the microservices run independently with their own databases, they can be reused between different apps. For example, you can run 3 kotahi apps for 3 different clients and let them all use the same anystyle microservice instance. This does not apply to flax however, which is bound to a specific kotahi backend.
It is important to note that the pagedjs microservice and flax specifically will not work as expected if they scale to more than one machine, due to the nature of their implementation. There have been discussions to potentially address that, but keep their scale to 1 until further notice.
Support
You can reach out to the kotahi team for questions and help in the following ways:
- Send a chat message on the Kotahi chat channel
- If you think you've found a bug, or that these docs are incorrect in some way, open a gitlab issue in Kotahi's gitlab repo.
- Ask a question on the Kotahi community forum